2

Baked Falafel


Baked Falafel

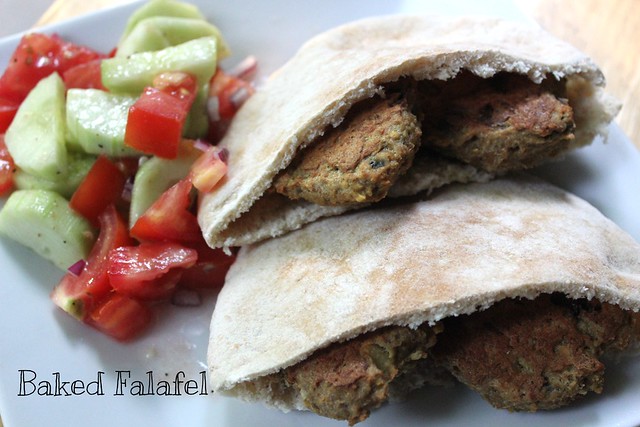
Inspired by our Universal Yums! May Snack box’s Israel theme, we decided to make some Israel-themed dinners.  Falafel are traditionally, deep-fried balls made from spiced, ground chickpeas.  They are often served in a pita with a yogurt or tahini-based sauce.  Falafel is not new to our family.  I’ve made it  in the past, more often than not, unsuccessfully.  Too many times I’ve had the balls disintegrate when trying to fry them.  I wasn’t in the mood for frying so this time I decided to try baking them.  When the kids heard we were having falafel for dinner I of course got the response, “I don’t like falafel!”  My son made a comment while they were baking that, “Something doesn’t smell good!” Well, they had the choice to eat them or not, but that’s what was for dinner.  I was pleasantly surprised (I think they were as well!) that they both ate (and possibly liked?!!) the falafel.  Baking the falafel made them nice and crunchy.  Normally, falafel has parsley.  I however, failed to pick some up during my weekly grocery shopping and wasn’t running out for a few sprigs of parsley!  I should also note that the red onion turned the falafel a dark purple/blackish color in spots.  It did not affect the flavor of the falafel, but you can use a regular onion if you prefer.  I also wasn’t fully thinking when creating the menu and shopping list and didn’t pick up ingredients for a sauce to serve with these.  However, if I was going to make a sauce, I would probably use this recipe for Magpie’s Cucumber Sauce from allrecipes.com courtesy of The Magpie.  I made a tomato cucumber salad that I served with the falafel and stuck some of the veggies inside the pita.

Baked Falafel
Recipe adapted from allrecipes.com courtesy of Bette

Ingredients:
1 teaspoon olive oil
1/2 cup red onion, chopped
2 (15 ounce) cans of chickpeas, drained and rinsed
3 cloves garlic
2 teaspoons ground cumin
1/2 teaspoon ground coriander
1/2 teaspoon salt
2 Tablespoons flour
1/4 cup panko crumbs
2 eggs, beaten
Cooking spray
Pitas
Lettuce, tomatoes, red onion slices (optional)
Cucumber or Tzatziki Sauce (optional)

Directions:
1.  Heat the olive oil in a small skillet over medium heat.  Add the onion and saute approximately 5 minutes, until the onions are soft.

2.  Place chickpeas through salt into a food processor and pulse until mixture is coarse.  Some chunks are okay.  Add the chickpea mixture to a large bowl.  Add the sautéed onions, flour, panko,  and eggs and stir until combined.  Let mixture sit for 15 minutes.  While mixture is sitting, preheat the oven to 400 degrees F.

3.  Line a baking sheet with aluminum foil and spray with cooking spray.  After fifteen minutes, shape the chickpea mixture into small patties (I was able to make 17) and place on prepared cookie sheet.  Spray the tops of the patties with the cooking spray.  Bake in the heated oven for 20 minutes.  After 20 minutes, flip the patties and cook for 10 to 15 minutes more.

4.  Cut pitas in half.  Place two falafel inside each pita half.  Serve with sauce, if you choose to make and/or lettuce, tomatoes and sliced red onion.

2

Friday Favorites #18 – Link Love Edition

Friday Favorites

Welcome to another Friday Favorites!  This week seemed to fly by!  My sister and her family visited from Maryland over the Memorial Day Weekend and the kids got in some quality time with their cousins.  My two week recovery from my surgery ended Wednesday and I started back at work.  So, we are back in the swing of things!  It’s been hard readjusting to regularly scheduled life!  This weekend is busy.  I am helping my daughter early Saturday morning do a road clean-up with Girl Scouts.  My son has a soccer game and then the Weekend Chef and I are going to our monthly Supper Club.  Sunday, my son has a birthday party and the rest of the day will hopefully be relaxing (you know errand running, grocery shopping, cleaning…..relaxing, right?!).  I really don’t have any special favorites for this week.

So, I’ve decided to share some random things I’ve been reading on the web:

America’s 20 Most Popular National Parks, Ranked – I would love to visit all of these some day.  America is so beautiful and it would be amazing to get the chance to see nature at its best.

If I was maybe in my 20’s and didn’t have two kids, I’d totally be up for this.

Summer is quickly approaching.  We will continue our weekly trips to the library and I am going to print up this Library Adventure Challenges.  This looks like a lot of fun and will help us discover new books and authors!

Summer hasn’t even officially started yet and I’ve already started to get eaten alive by mosquitoes.  I have itchy bumps all over that I know I’m NOT supposed to scratch…..but it’s so hard!  I should definitely look into finding some of these plants.

I can’t believe that Monday is the first day of June!  I hope to follow this Simple Summer Challenge for keeping the house clean.

We are trying to plan a summer camping trip.  We may have to try out some of these recipes.

I know they’ve created a newer game, but is anyone still hooked on this game, like me?  I stopped playing awhile ago and don’t know why I got back into it.  It’s a total time waster and I’m stuck on level 140.  But it’s so addicting and I’ve been playing every night!

I love hard apple cider like Angry Orchard.  However, I’ve been really wanting to try this hard pear cider?  I haven’t found it yet…..have you tried it?!!

Hope everyone has a great weekend!

Linking up with Tif @ Bright on a Budget, Amanda from Meet @ The Barre, Andrea @ Momfessionals and Jennie @ The Diary of a Real Housewife!


Sausage Peppers and Onions Pasta Casserole


IMG_0293

Summer will be here soon.  That means lots of grilling and BBQs.  When I get tired of burgers and hot dogs, sausage and peppers is always a hit!  I recently found this pasta dish that combines all of the flavors of the summer fave that can be made anytime of the year.  With the gooey cheese and pasta, this is a comfort dish.  I made this last week before the temperatures took a sudden rise!  I recommend saving this recipe for a cooler day when a hearty, filling pasta dish is needed.  This was a hit with everyone, including the kids!

Sausage Peppers and Onion Pasta Casserole
Recipe adapted from Family Foodie

Ingredients:
1 pound ziti
1 pound sweet Italian sausage, casing removed
½ cup butter
1 bell pepper cut into strips
1 small yellow onion, sliced
⅓ cup all-purpose flour
2¼ cups milk
2 cups shredded mozzarella cheese
¼ cup grated parmesan cheese
salt and pepper to taste

Directions:
1. Preheat oven to 350º F.  Spray 9×13 inch baking dish with cooking spray.  Cook pasta according to directions on box.

2.  In a large skillet, over medium high heat, brown the sausage, breaking up into small crumbles.  Once browned, remove the sausage from the pan and drain the fat.

3.  Melt the butter in the skillet then add the peppers and onions, sautéing until tender.

4.  Stir the flour into the pepper and onion mixture and then slowly add the milk.  Cook over low heat, stirring constantly until blended well.  Stir in the 1 1/2 cups of mozzarella cheese, the 1/4 cup of grated parmesan cheese and salt and pepper to taste.

5.  Stir the cooked pasta and sausage into the cheese mixture.  Once combined pour into the prepared baking dish.  Bake for approximately 30 minutes or until cheese is bubbly.


2

Friday Favorites #15

Friday Favorites

I hope everyone had a great week.  The weather was beautiful, work wasn’t too stressful this week….can’t complain!    I played the last tennis match of my spring league on Monday and ended with a win!  Our daughter came in second place in the school spelling bee finals!  Both my mom and brother celebrated birthdays this week. Since this was such a busy week we didn’t get to celebrate, but are planning a joint birthday/Mother’s Day celebration on Sunday.  Speaking of Mother’s Day, I hope all my fellow moms out there get a nice, relaxing day on Sunday!  I am turning this week’s Friday Favorites over to the Weekend Chef.  It’s nice to hear from the guys every now and then, right?!


1.  UrbanSpace – The Garment District in Manhattan is again hosting an outdoor food market from May 4 to June 14. Go to Broadway between 38th and 41st street and marvel in the variety. Vendors this year include purveyors of Korean tacos, lobster rolls, doughnuts, Lebanese, BBQ, Sicilian rice balls and so much more! Too many choices for lunch and the weather is too perfect! Help!


2.  Microsoft Solitaire Collection  – Yes, I’ve overplayed some recent trendy games on my phone like Trivia Crack. All cracked out now, thanks. I always end up going back to the classics and Microsoft Solitaire is the ultimate classic. It just happens to look way better than 20 years ago, too.

Microsoft Solitaire Collection

3.  AM and PM daylight commute  – The sun lights up my trip to the office when I leave the house at 6:40 in the morning and is still there to welcome me back at 7 at night. When the trip is dark in one or both directions, it’s depressing. And then you get snowed on.

4.  Yuengling Black and Tan  – Yuengling proudly touts their history as America’s oldest brewery. Yes, history and longevity is cool. Even better, every Yuengling variety available around here (their brewery is in PA) is delicious. Even better than that, it’s always one of the most cost-effective buys (cheap, cheap) and is readily in stock in most supermarkets. My particular preference is for the Black and Tan. It’s not too dark and bitter and is still refreshing as a summer drink.

5.  Double Edge Razors  – I gave up electric razors years ago and started using double edge safety razors and a shave brush. Pretty old fashioned but coming back into style as blade companies try selling everyone 5 and 6 blade razors at high prices.. After an initial outlay of $25 to $50 for the nearly bulletproof razor itself, blades are about $3 and up for 10 blades. Good for about a week of shaves per $.30 blade and plenty sharp. My razor of choice is the German-forged Merkur Classic, but you can find a wide variety out there of new an old styles.

Hope you have a great weekend!

We are linking up with Tif @ Bright on a Budget, Andrea @ Momfessionals, Amanda from Meet @ The Barre and Jennie @ The Diary of a Real Housewife.

1

Taco Tuesday Turkey Burger

"Taco Tuesday" Turkey Burger

In honor of Cinco de Mayo, the Weekend Chef created this “Taco Tuesday” Burger.  We’ve had our share of taco dinners…..because really, who doesn’t love tacos?  We’re guilty of using the occasional boxed set from the supermarket. You know what I’m talking about: corn taco shells, pouch of sauce, and a pouch of seasoning. The Weekend Chef’s taken all the elements of a traditional taco and created a burger that was ah-mazing!  We’ve upgraded from the packaged taco seasoning to Penzeys Taco Seasoning blend.  There are plenty of online recipes for homemade taco seasoning blends as well if you prefer to go that route. Like tacos, these burgers are versatile, in that each family member can choose what toppings they want on their burger.  Our son HATES guacamole and wanted nothing to do with it.  Meanwhile, our daughter who doesn’t usually eat guacamole enjoyed it with all of the other toppings on her burger.  Warning, be sure to have LOTS of napkins handy!  We found these burgers to be a bit messy…..but totally worth it!

Taco Tuesday Turkey Burger
Recipe from the Weekend Chef of NY Foodie Family

Ingredients:
1 lb. ground turkey
2 Tbsp. Taco Seasoning (we used Penzeys)
1/2 cup shredded Mexican blend cheese
4 hamburger buns
4 slices Cheddar cheese
lettuce
tomato
sour cream
guacamole (see recipe below)

For the guacamole:
2 ripe avocados, chopped
1 plum tomato
1/4 cup chopped red onion
1 lime
1 Tablespoon cilantro, chopped
1 teaspoon salt
1/2 teaspoon pepper

Directions:
1.  Heat a large non-stick skillet over medium-high heat.  Meanwhile, in a large bowl combine the ground turkey, taco seasoning and the shredded cheese.  Hand form into four patties.  Place patties in the heated pan and cook approximately 8-10 minutes on each side, depending on thickness of your patties, or until cooked through.

2.  While the burgers are cooking, prepare the guacamole.    Combine all of the ingredients in a medium bowl and mash to your desired consistency.

3.  Once burgers are done cooking, place a slice of cheddar cheese on each burger and let melt.  Place a burger on each hamburger bun.  Garnish with lettuce, tomato, guacamole and a dollop of sour cream, if desired.  Serve and enjoy!

Foodie TV Review: The Layover

The Layover (2011) Poster

This week’s review from the Weekend Chef is on another TV food series. As promised last week, we’re seeing Anthony Bourdain again. Love him or hate him, he has been prolific over the last decade with food-based programs and especially food-based travel programs. Don’t be surprised if he pops up again in a future review.

The premise of The Layover is the idea that if you have a couple of days in a city during a layover, how do you make the best use of the time? Anthony Bourdain gives the impression that every episode involves a real layover on his way somewhere else. I’m not buying it. Just be honest with me, Travel Channel, and say it’s pretend and then I can stop thinking about it while I watch. In any case, every episode of the show focuses on one city (Los Angeles, Amsterdam, London, etc.). He typically has a local guide of sorts taking him to all the best food spots in town. Some are in the main tourist areas and some are off the beaten path. Anthony tries to boil down and enjoy the essence of the city in the short span he’s there. He interviews both chefs and locals alike to get a handle on the culinary and cultural trends. More often than not, the real and best parts of a city can be enjoyed both inexpensively and without pretense: pubs, taco shacks, greasy spoons. This is essential the way our family tries to access a new place, by ignoring the overpriced tourist traps and franchises and find the unique and local. It would probably help to have a dedicated guide and a bunch of chefs eager to share their wares, but we seem to do ok without. Internet research can be your friend.

How do you find your way around a city? Please share in the comments section!

Chewy Lemon Cookies

Chewy Lemon Cookies

As I mentioned in Monday’s post, our February supper club’s theme was citrus (yes, I’m really behind on posts!).  I chose to make dessert and made the Coconut Key Lime Pie that I had posted Monday.  I rarely choose to make dessert for supper club because I feel so much pressure!  If my dish for the main meal doesn’t work out, there are several other dishes to help round out the meal and it’s not a big deal (not that this has ever really happened, luckily!).  Making dessert, you’re on your own!  If it ends up being a fail, then the group goes without dessert (insert sad face).    To help alleviate my stress I decided to make these Chewy Lemon Cookies as back-up!  While I mentioned I’m not a citrus fan, I somehow made two citrus desserts that I enjoyed!  These cookies were basically a sugar cookie with a hint of lemon.  They were nice and soft and chewy.  You could definitely taste the lemon flavor, but it was not overpowering or mouth-puckering.  These are cookies that I’d make again, especially when I’m in the mood for something non-chocolatey.

Chewy Lemon Cookies
Recipe from blog how sweet it is

Ingredients:
2 cups + 2 tablespoons all-purpose flour
1/2 teaspoons baking soda
1/4 teaspoon salt
1 stick of butter, melted and cooled
1 cup granulated sugar
1/4 cup brown sugar
1 egg + 1 egg yolk, at room temperature
2 tablespoons freshly squeezed lemon juice
2 teaspoons freshly grated lemon zest
1 teaspoon vanilla extract
1 teaspoon lemon extract

Directions:
1. Preheat oven to 325 degrees F.  In a small bowl, mix the flour, baking soda and salt and set aside.

2. In a large bowl, add the cooled, melted butter and whisk in the sugar until smooth. Add in the egg and egg yolk, mixing to combine.  Whisk in the lemon juice, lemon zest, vanilla and lemon extracts. Stir in the flour mixture until a dough forms. If needed, use your hands to help mix the dough.

3.  Scoop the dough into golf-ball sized balls and place on a baking sheet 2 inches apart. Bake for 10-12 minutes, or until middle is just set an edges are slightly golden.  Let cool on wire racks and then enjoy!

1

Coconut Key Lime Pie

Key Lime Pie

I never thought of myself as a big citrus fan.  I enjoy a grapefruit every now and then and like some lemon slices in my water or diet soda.  Our supper club’s February theme was citrus and I picked dessert.  I was looking for a recipe that I normally wouldn’t make.  Pies?  Rarely if ever, do I make them so I went with it.  Lemon meringue was definitely out.  I highly dislike it!  I found this recipe which is a variation on the traditional key lime pie and decided to attempt to make it.  I’m not a big key lime pie lover either, but this sounded a bit more appealing.  Well, after making this, I may be a convert!  This pie was REALLY good!  I wasn’t sure I’d be able to find key limes and was pleasantly surprised to find a bag at my local Shoprite!  I’m not much of a baker.  While this recipe had multiple steps and required some chilling time, overall it was really easy to make.  The most time consuming task was squeezing the juice out of the tiny key limes!  Did I mention that this pie was really tasty?!!!  We all enjoyed it a lot.  I liked how the coconut flavor was subtle, but evident.  The key limes gave a slight tang to the creamy filling.  Unfortunately, I didn’t get a pic of the pie sliced.  However, I will have to rectify that.  Since this is a perfect summer dessert, I plan on making it again soon!

Coconut Key Lime Pie
Recipe from blog A Cozy Kitchen

Ingredients:
1 cup finely ground graham cracker crumbs
2 tablespoons granulated sugar
1/4 teaspoon salt
6 tablespoon butter, melted
1 (15-ounce) can full-fat unsweetened coconut milk
1 1/2 teaspoons finely grated key lime zest (from about 4 key limes)
1/3 cup fresh key lime juice (from about 6 key limes)
5 large egg yolks
1 (14-ounce) can sweetened condensed milk
1/2 teaspoon salt
2 tablespoons sweetened or unsweetened coconut flakes
2 tablespoons powdered sugar
1 cup heavy cream

Directions:
1.  For the crust:  Preheat the oven to 350 degrees F. In a medium bowl, mix together the graham cracker crumbs, sugar, salt and butter. Pour the mixture into a standard 9-inch pie dish, making sure to press the crumbs up the sides and all over the bottom of the dish until you have a nice, even layer of crust.  Bake in the oven for 10 to 12 minutes, until lightly golden brown. Remove and set aside, letting the crust cool completely. Turn the oven down to 325 degrees F.

2. For the filling:  In a small bowl, set aside three tablespoons of the coconut cream that’s sitting at the top of the can of coconut milk. Place the bowl of coconut cream in the refrigerator to be used later as part of the topping. Stir the remaining coconut cream and coconut milk together, making sure to break up any large clumps. In a large bowl, whisk together the coconut milk, key lime zest, key lime juice, egg yolks, sweetened condensed milk and salt.

3. Place the cooled pie dish on a baking sheet and transfer to the middle rack of the oven. Pour in the filling and allow to bake for 45 to 50 minutes, until the top is firm to the touch yet still a wobbly. Once done, remove from the oven and let cool for approximately 10 minutes. Transfer the pie to the fridge letting it set for at least 2 hours. While the oven is still on, place the coconut flakes on a baking sheet and toast for about 5 minutes in the oven, until lightly golden brown. Set aside and turn oven off.

4. For the topping:   Right before serving add the reserved, refrigerated coconut cream and powdered sugar to the bowl of a stand-up mixer with the whisk attachment; beating approximately 2 minutes until smooth. With the mixer running, pour in about 2 tablespoons of heavy cream beating until incorporated. Slowly pour in the rest of the heavy cream until smooth and medium peaks form, about 2 minutes.

5. Spread the whipped cream on top of the pie, sprinkle the toasted coconut flakes on top, slice and serve.


2

Thai Peanut Butter & Bacon Turkey Burger

Thai Peanut Butter Turkey Burger

No joke, typing this post is making my mouth drool.  I’m remembering how good these burgers were when I made them and I need to eat one of these now!  The combination of salty bacon, sweet pineapple and spicy sriarcha is the holy grail of burgers.  These are so flavorful ,that after making these, you probably won’t want a regular burger again.  The only adaptation we made to the kids’ burgers was to omit the sriracha garlic chili sauce.  Otherwise, they ate them as is.  Of course, what’s not kid-friendly about these?!!  Bacon, pineapple and peanut butter….some of their favorite foods.  They were sold and their burgers were devoured!

Thai Peanut Butter & Bacon Turkey Burger
Recipe adapted from The Noshery

Ingredients:
1 lb. ground turkey
1 Tbsp. Montreal Chicken Seasoning
8 pieces bacon, cooked
4 sliced pineapple rings (we used canned)
Peanut butter
Sriracha Garlic Chili Sauce
Cilantro
4 hamburger buns

Directions:
1. Mix ground turkey and Montreal Chicken Seasoning until combined and then form into four patties.

2. Heat a large skillet over medium heat.  Once the pan is heated, add the burgers to the pan, cooking approximately 3-4 minutes on each side until cooked through (to at least 160 degrees F, as recommended by the USDA).

3.  While burgers are cooking, prepare the buns by laying them open.  If using sriracha sauce, you can add to the top of the bun.  Once burgers are done, place one burger on each bun bottom.  If you’d like your pineapple rings warmed, put them into the heated skillet and cook approximately 30 seconds on each side to warm through.  Add a spoonful of peanut butter to the top of the warm burger.  Lay two slices of the cooked bacon on top of the peanut butter.  Add a pineapple ring and garnish with cilantro.

2

Risotto-Style Pasta with Caramelized Onions

Risotto-Style Pasta with Caramelized Onions

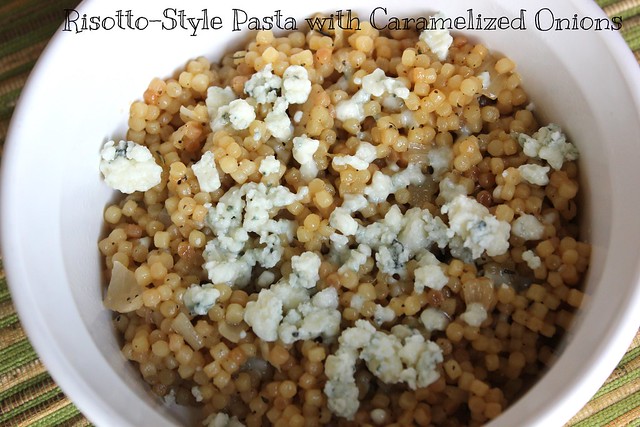
Risotto is a classic Italian rice dish made by cooking a special variety of rice (usually Arborio) in broth, which helps release the starch of the rice, creating a creamy, comforting dish.  While I have made my share of risottos, this recipe interested me since it used pasta.  I’m not picky….I’ll take my carbs in any variety!  This dish was simple yet so flavorful.  It takes a little time to constantly stir the pasta while it absorbs the broth.  However, it is worth it!  Toasting the pasta in the beginning of the recipe gives the dish a nice, nutty flavor.  Add in the sweetness of the caramelized onions and the tang of the Gorgonzola cheese and this dish is so flavorful!  The Weekend Chef noted that this is a dish that you’d find in a restaurant.  I made this dish with vegetable broth to keep it vegetarian.  Since my daughter does not like Gorgonzola, I scooped out a portion of the pasta for her prior to adding the crumbled cheese.  Serve with a salad and you have a perfect meal!

Risotto-Style Pasta with Caramelized Onions
Recipe adapted from Cooking Light, December 2014

Ingredients:
2 tablespoons olive oil, divided
1 1/2 cups diced yellow onion
1 1/4 cups uncooked acini di pepe pasta (about 8.4 ounces)
3 cups unsalted vegetable stock, divided
1/2 cup white wine
1/2 teaspoon kosher salt
1/4 teaspoon freshly ground black pepper
1/4 teaspoon dried thyme
1/2 cup crumbled Gorgonzola

Directions:

1. Heat a medium skillet over medium heat. Add 1 tablespoon of olive oil to the pan. Add the onion reducing heat to low, and cook 20 minutes or until onion is light brown, creamy, and caramelized, stirring occasionally. Once caramelized, remove the pan from the heat and set aside.

2. Heat a large saucepan over medium heat. Add the remaining 1 tablespoon of olive oil. Add the pasta to the saucepan cooking 5 minutes or until the pasta is a nice toasty color, stirring constantly. Add the onion and 1 cup stock, stirring frequently until the stock is absorbed. Once the pasta absorbs the stock, add the wine.  Continue adding the rest of the stock, 1/2 cup at a time, stirring frequently until each portion is absorbed before adding the next. Test the pasta, as you want it to be al dente.  When it’s done, stir in salt, pepper and dried thyme. Remove from the heat and add the crumbled Gorgonzola cheese; stirring gently to mostly melt the cheese, but allowing for some chunks.  Serve immediately and enjoy!